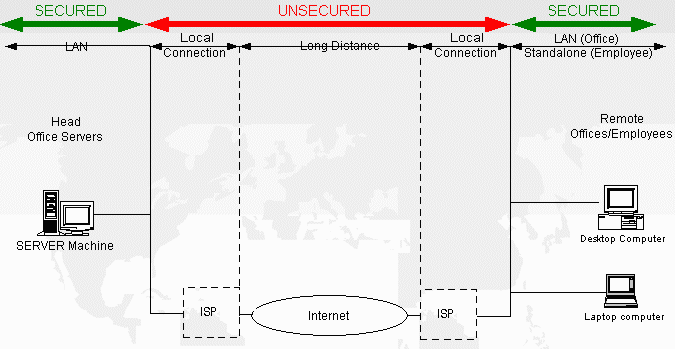
GoodTech Secure Network for Windows V3.0 Online Help Introduction to GoodTech Secure Network GoodTech Secure Network Key Features How the GoodTech Secure Client Works How the GoodTech Secure Server Works Installing GoodTech Secure Network Installing GoodTech Secure Client Installing GoodTech Secure Server Configuring the GoodTech Secure Client Configuring the GoodTech Secure Server Administrating the GoodTech Secure Client Controlling the GoodTech Secure Client Service Starting the GoodTech Secure Client Service Stopping the GoodTech Secure Client Service Pausing the GoodTech Secure Client Service Administrating the GoodTech Secure Server Controlling the GoodTech Secure Server Service Starting the GoodTech Secure Server Service Stopping the GoodTech Secure Server Service Pausing the GoodTech Secure Server Service Working with GoodTech Secure Network Diagrams Diagram 1 – Unsecured connection Diagram 4– Multiple applications Screen Shots Screen Shot 1 – Windows NT Services Program, GoodTech Secure Client automatic startup Screen Shot 2 – GSCONFIG.DAT parameter file Screen Shot 3– Windows NT Services Program, GoodTech Secure Server automatic startup Screen Shot 4– GSCONFIG.DAT parameter file Screen Shot 5 – GoodTech Secure Client, Log File Screen Shot 6– GoodTech Secure Server, Log File Screen Shot 7 – Creating a new session (gt_create_session.exe) Screen Shot 8 – Secured Telnet Session Screen Shot 9 – Secured FTP Session Screen Shot 11 – Password utility (gt_crypt_pass.exe) This help document gives you an introduction to GoodTech Secure network products, describes how to install, set up and use the Secure network products, and has a trouble shooting chapter to help you overcome problems. We hope you will find it helpful. Although we did our best to proofread this help, we are unfortunately not immune to mistakes and omissions. If you find any mistake or have suggestions to improve this help, please let us know. Introduction to GoodTech Secure Network Much of the information transmitted across a company network is of private nature. However, companies use the unsecured Internet channel to connect remote offices and remote employees. The diagram below illustrates a typical unsecure connection over the Internet:
Diagram 1 – unsecured connection GoodTech Secure Network turn the unsecured Internet channel into a secured one and let companies benefit from a secured Internet. GoodTech Secure Network contains two components that together build a secure channel:
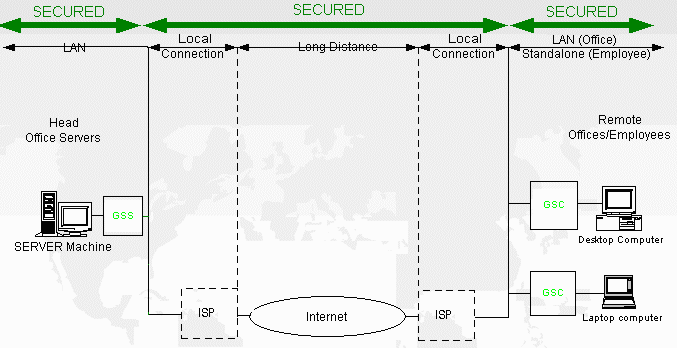
The diagram below illustrates a typical connection secured by GoodTech Secure Network:
Diagram 2 – secured connection GoodTech Secure Network is not only secure but also easy to use, reliable and affordable. GoodTech Secure Network Key Features
How Does GoodTech Secure Network Work
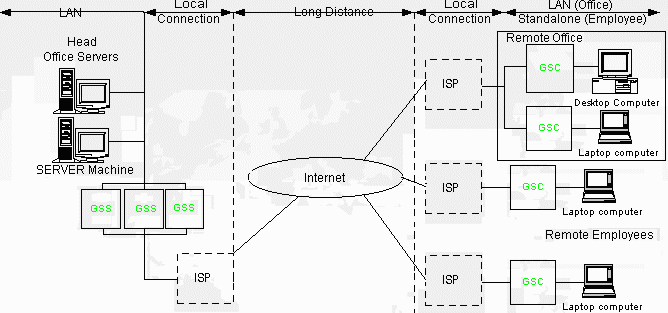
The GoodTech Secure Network architecture is pretty flexible. You can build your system with one or more GSS components and one or more GSC components. Servers can share a single GSS component (economic), can have a GSS component each (modular), can share multiple GSS components (performer) as well as combinations of economic/modular/performer configurations. In a similar way clients in a remote office can share one GSC component (economic), can have a GSC component each (modular), can share GSC components (performer), as well as combinations of economic/modular/performer configurations. Remote employees can not share GSC and each has to have GSC component on his machine. Any combination of GSS components and GSC components is supported. For example, you can structure your system with performer configuration in the head office and have a modular client configuration in your remote offices. It is pretty simple to restructure the components so you can always start with the economic configuration and upgrade to a modular system with better performance once need comes up and your budget allows it. The diagram below illustrates performer configuration in the head office, modular client configuration in a remote office and remote employees:
Diagram 4 – multiple applications How the GoodTech Secure Client Works The GoodTech Secure Client should be installed on the client side of the application you want to secure. The installation program creates a service called gsc and adds it to the list of services available on your Windows system. When the Secure Client service is started, either manually or automatically, it executes a program named gsc.exe. The program gsc.exe opens a log file gsc.log in the %gt_gsc_installation_dir% directory.(gt_gsc_installation_dir is a the system environment variable created during installation, that contains the GoodTech Secure Client installation directory.) Gsc.exe is now ready for connection requests. It listens to requests on the configured ports Telnet, Ftp and 3 predefined Application ports. When a user wants to open a secure telnet/ftp or other secure connection using TCP/IP, he connects to the application defined port where the Secure Client is running. The Secure client connects to the configured host/port of the GoodTech Secure Server via a secure channel and tells it the type of application/protocol that the user is using. The Secure Server connects to the server application host/port and a secure channel is established (encrypted channel) between the client application and the server application. How the GoodTech Secure Server Works The installation program creates a service called gss and adds it to the list of services available on your Windows system. When the Secure Server service is started, either manually or automatically, it executes a program named gss.exe. The program gss.exe opens a log file gss.log in the %gt_gss_installation_dir% directory.(gt_gss_installation_dir is the system environment variable, created during installation, that contains the GoodTech Secure Server installation directory.) Gss.exe is now ready for connection requests from any Secure Client program on the configured port (the default is 100). When the Secure Server receives a connection request from a Secure Client it tries to connect to the server application host with the configured port. If the connection succeeds, a new secure (encrypted) channel is opened and the user client server application communicates through an encrypted and secure session. Registration is very simple - you are automatically registered when you order from GoodTech Systems. When we receive your order, we will send you back your registration number along with your registered copy of the product. Our simple licensing policy lets you purchase as many copies as you need and get a single license for all copies. Installing GoodTech Secure Network GoodTech Secure Network runs on Windows 98/Me and Windows NT(4.0)/2000. The TCP/IP protocol must be installed on your Windows system. This protocol is included with the Windows operating system but is not always installed on all systems. You can check if TCP/IP is installed on your system by choosing Network from the Control Panel. If TCP/IP is installed on your system it should show up in the list of Installed Network Protocols. You should use the Administrator account or any other account with administration privileges to install the GoodTech Secure Client. (Windows NT/2000) Windows NT/2000: Make sure that all users other than the administrator group have no permissions to the Secure Client installation directory. The best way to do it is by installing the product on a NTFS drive and use built-in NT/2000 security to protect the files. Please note that in order to get the Secure Network to work correctly, you need to install the GoodTech Secure Client on your local machine where the client application is running, or on any machine that reside on your local network if this network is secured. You should install the GoodTech Secure Server on a machine where your server application is running, or on any machine on the local network where this server application is running. Installing the GoodTech Secure Client Running the Installation Program After downloading the evaluation copy of the GoodTech Secure Client or receiving the registered copy, you have to perform the following steps: Unzip the GSC zip file to your installation directory on one of your local drives, recommended on NTFS (NT/2000). Installation on a network drive is not supported. After extracting the zipped file you will see the following files in your Secure Client installation directory: README.htm - Make sure you read this file before proceeding with the installation process. Install.exe - The GoodTech Secure Client installation program. Run install.exe to install GoodTech Secure Client. The installation program will ask you the following questions:
If you want to install a new version of the Secure Client but have a previous version currently installed on your system, you have to do the following: Stop the GoodTech Secure Client Service. Please refer to "stopping the GoodTech Secure Client" for information on how to stop the service.Uninstall your current version of GoodTech Secure Client. Please refer to "Running the Uninstall Program".Follow the installation steps for the new version. If you want to uninstall the GoodTech Secure Client from your system, all you have to do is: Make sure the gsc service is not running. If it is running, stop the service. Run uninstall.exe to uninstall your current version of GoodTech Secure Client. Installing the GoodTech Secure Server Running the Installation Program After downloading the evaluation copy of the GoodTech Secure Server or receiving the registered copy, you have to perform the following steps: Unzip the GSS zip file to your installation directory on one of your local drives, recommended on NTFS (NT/2000). Installation on a network drive is not supported.After extracting the zipped file you will see the following files in your Secure Server installation directory: README.htm - Make sure you read this file before proceeding with the installation process. Run install.exe to install GoodTech Secure Server. The installation program will ask you the following questions:
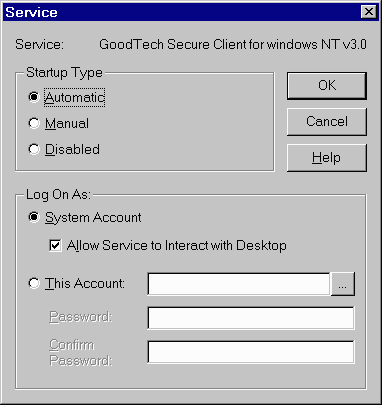
If you want to install a new version of the Secure Server but have a previous version currently on your system, you have to do the following: Stop the GoodTech Secure Server Service. Please refer to "stopping the GoodTech Secure Server" for information on how to stop the service.Uninstall your current version of GoodTech Secure Server. Please refer to "Running the Uninstall Program".Follow the installation steps for the new version. If you want to uninstall the GoodTech Secure Server from your system, all you have to do is: Make sure the gss service is not running. If it is running, stop the service. Run uninstall.exe to uninstall your current version of GoodTech Secure Server. Configuring the GoodTech Secure Client Setting up parameters to GoodTech Secure Client It is possible to specify an automatic startup for the GoodTech Secure Client. To do so, you have to perform the following steps: Go to the Control Panel / Services program, select GoodTech Secure Client from the list of Services, push the Startup button, and then, select automatic startup.
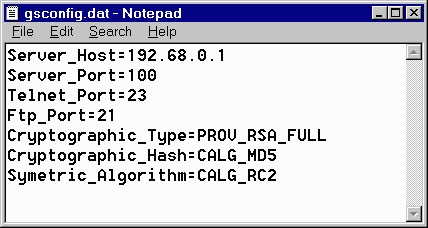
Screen Shot 1 – Windows NT Services Program, GoodTech Secure Client automatic startup The next time you will restart your computer, the GoodTech Secure Client service will start automatically. Configuration Parameters (GSCONFIG.DAT) GoodTech Secure Client (GSC) is reading GSCONFIG.DAT for configuration parameters. Server_Host - Defines the name of the GoodTech Secure Server (GSS) Host or IP address. This parameter may contain more than one Host/IP. For example, you can put two Hosts separated by commas. For example, Server_Host=Host1,Host2 Server_Port - Defines the GoodTech Secure Server (GSS) listening port number. You can put more than one port number in this parameter. For example, Server_Port =100,110. These port numbers correspond to each server name in the Server_Host parameter. Telnet_Port - Defines the secure listening Telnet port number that accepts Telnet requests from a Telnet client application. The Telnet client application should use this port number when connecting to GoodTech Secure Client (GSC) application. If the Telnet client application does not use this port number the Telnet session will not be secured. Ftp_Port - Defines the secure listening Ftp port number that accepts Ftp requests from a Ftp client application. The Ftp client application should use this port number when connecting to GoodTech Secure Client (GSC) application. If the Ftp client application does not use this port number the Ftp session will not be secured. Cryptographic_Type - Supported types are: PROV_RSA_FULL and PROV_DSS_DH. The PROV_RSA_FULL provider type supports both digital signatures and data encryption. It is considered a general
purpose CSP. The RSA public-key algorithm is used for all public-key operations. Algorithms Supported: Key Exchange - RSA: is the most popular public-key algorithm. It can be used for both encryption and digital signatures. Encryption - The PROV_DSS_DH provider is a superset of the PROV_DSS provider type. Algorithms Supported: Key Exchange - DH: (Diffie-Hellman) A public-key algorithm used for secure key exchange. Encryption - CYLINK_MEK: An encryption algorithm that uses a 40-bit variant of a DES key where 16 bits of the 56-bit DES key are set to zero. This algorithm is implemented as specified in the IETF Draft specification for 40-bit DES. DES: uses a 56-bit key, and maps a 64-bit input block into a 64-bit output block. The key appears to be a 64-bit key, but one bit in each of the 8 bytes is used for odd parity, resulting in 56 bits of usable key The default type is PROV_RSA_FULL. Cryptographic_Hash - Identifies the hash algorithm. Supported hash algorithm are: MD5 and SHA. The default is MD5. Symetric_Algorithm - Identifying the symmetric encryption algorithm. Supported symetric algorithm are: RC2,RC4 and DES. The default is RC2. Provider_Name -Identifies the name of the CSP to be used. The supported CSP are: MS_DEF_PROV and MS_ENHANCED_PROV. The default is MS_DEF_PROV. MS_DEF_PROV: Microsoft Base Cryptographic Provider v1.0 Trace - Enables trace information. To enable trace information specify YES. The default is no trace. Encrypt - Disables encryption. To disable encryption specify NO. The default is to encrypt all sessions. Please note that you should not disable encryption if it is not necessary. Appl1_Port - Defines an application listening port number for predefined application1. Appl2_Port - Defines an application listening port number for predefined application2. Appl3_Port - Defines an application listening port number for predefined application3. Local_Port1 - Defines the temporary start port number for GSC. The default port number is 1124. Local_Port2 - Defines the temporary start port number for GSC. The default port number is 3024. Session_Port - Defines the listening session port number. The default is port number 120. Main_Port - Defines the internal port number to used by GSC. The default is port 140. Read_Buffer - Defines the buffer size for the session. The default size is 256. The maximum size is 512. Session_Timeout - Defines the timeout in seconds for new created sessions. This parameter determine how much time new created sessions will remain open until client application is connected to them. Connection_Lifetime - Defines the lifetime for closed connections. The default is to reuse the closed connections. When a 0 value is defined the connection will remain open for infinite time. Login_Idle - Defines the timeout value for idle login to GSC. The default is infinite. Predefined_Connections - Defines a set of predefined connections to be used when a client is connected. The syntax is port,host,type:[port,host,type:] For example, if you put 205,host1,1: any telnet client application can use a secure telnet session by connecting to the host
where the GSC is running using port 205 and immediately the telnet session will connect to host1 where the telnet server is
running. We currently support up to 10 predefined connections. Please make sure that you terminate the line with : Each parameter in the GSCONFIG.DAT file should be written exactly as described in this help file (case sensitive) and
immediately followed by '=' char. For example, to add trace information you should put in the GSCONFIG.DAT file the line
Trace=YES. Each parameter should be in a separate line.
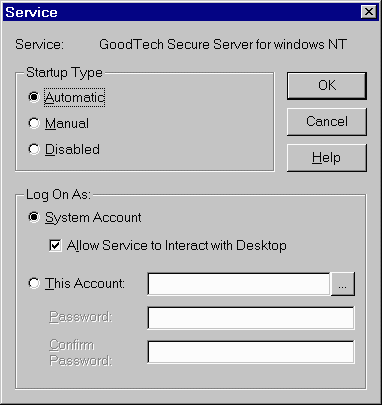
You may optionally restrict connections to GoodTech Secure Client based upon the host or IP address. Remote access may be limited only to specific hosts or IP addresses. Restrictions based on host or IP are enforced when the file GT_IPF.DAT exists in your installation directory. The first line in this file can be ONE of the keywords, INCLUDE or EXCLUDE. When the first line contains the INCLUDE keyword, then all hosts or IP addresses listed on the following lines are the only hosts/IP addresses that have the permission to access the GSC. (All other hosts or IP addresses are not allowed). If the first line contains the keyword EXCLUDE, then all hosts/IP addresses listed after this line do not have permission to access the GSC. (All other hosts or IP addresses are allowed.) Configuring the GoodTech Secure Server Setting up parameters to GoodTech Secure Server It is possible to specify an automatic startup for the GoodTech Secure Server. To do so, you have to perform the following steps: Go to the Control Panel / Services program, select GoodTech Secure Server from the list of Services, push the Startup button, and then, select automatic startup.
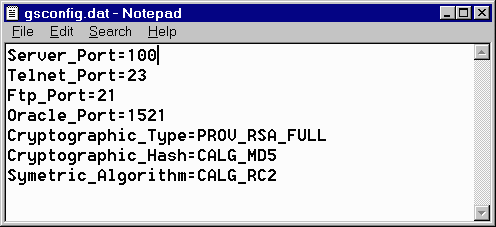
Screen Shot 3– Windows NT Services Program, GoodTech Secure Server automatic startup The next time you will restart your computer, the GoodTech Secure Server service will start automatically. Configuration Parameters (GSCONFIG.DAT) GoodTech Secure Server (GSS) is reading GSCONFIG.DAT for it's parameters. Server_Port - Defines the GoodTech Secure Server (GSS) listening port number. Telnet_Port - Defines the Telnet server port number that GoodTech Secure Server will use when a Telnet secured session is created by the GoodTech Secure Client. Ftp_Port - Defines the Ftp server port number that GoodTech Secure Server will use when a Ftp secured session is created by the GoodTech Secure Client. Oracle_Port - Defines the Oracle Listener port number that GoodTech Secure Server will use when a Oracle secured session is created by the GoodTech Secure Client. Cryptographic_Type - See above Cryptographic_Hash - See above Symetric_Algorithm - See above Provider_Name - See above Trace - Enables trace information. To enable trace information specify YES. The default is no trace. Encrypt - Disables encryption. To disable encryption specify NO. The default is to encrypt all sessions. Please note that you should not disable encryption if it is not necessary. Appl1_Port - Defines an application connecting port number for predefined application1. Appl2_Port - Defines an application connecting port number for predefined application2. Appl3_Port - Defines an application connecting port number for predefined application3. Read_Buffer - Defines the buffer size for the session. The default size is 256. The maximum size is 512. Session_Timeout - Defines the timeout in seconds for new created sessions. This parameter determine how much time new created sessions will remain open until client application is connected to them. Telnet_Catch_Port - defines a Telnet listening port number to catch unsecured Telnet connections. Ftp_Catch_Port - defines a Ftp listening port number to catch unsecured Ftp connections. Oracle_Catch_Port - defines a Oracle listening port number to catch unsecured Oracle connections. Appl1_Catch_Port - defines an Application1 listening port number to catch unsecured Application1 connections. Appl2_Catch_Port - defines a Application2 listening port number to catch unsecured Application2 connections. Appl3_Catch_Port - defines a Application3 listening port number to catch unsecured Application3 connections. Each parameter in the GSCONFIG.DAT file should be written exactly is described in this help file (Case sensitive) and
immediately followed by '=' char. For example, to add trace information you should put in the GSCONFIG.DAT file the line
Trace=YES. Each parameter should be in a separate line.
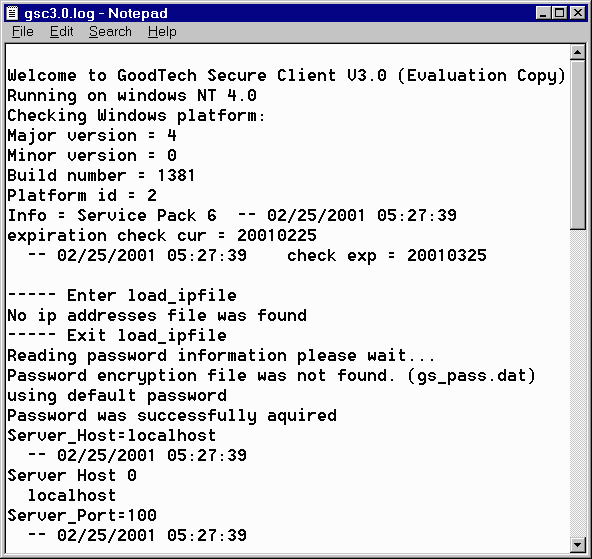
Connection Restriction based on Host or IP Address You may optionally restrict connections to GoodTech Secure Client based upon the host or IP address. Remote access may be limited only to specific hosts or IP addresses. Restrictions based on host or IP are enforced when the file GT_IPF.DAT exists in your installation directory. The first line in this file can be ONE of the keywords, INCLUDE or EXCLUDE. When the first line contains the INCLUDE keyword, then all hosts or IP addresses listed on the following lines are the only hosts/IP addresses that have the permission to access the GSC. (All other hosts or IP addresses are not allowed). If the first line contains the keyword EXCLUDE, then all hosts/IP addresses listed after this line do not have permission to access the GSC. (All other hosts or IP addresses are allowed.) Administrating GoodTech Secure Client Controlling the GoodTech Secure Client Service Starting the GoodTech Secure Client Service Go to the Control Panel / Services program, select GoodTech Secure Client from the list of Services and press the Start button. (Windows NT/2000) Go to the Command Shell Prompt and type "NET START GSC". Stopping the GoodTech Secure Client Service Go to the Control Panel / Services program, select GoodTech Secure Client from the list of Services and press the Stop button. (Windows NT/2000) Go to the Command Shell Prompt and type "NET STOP GSC" . Pausing the GoodTech Secure Client Service (Windows NT/2000) Go to the Control Panel / Services program, select GoodTech Secure Client from the list of Services and press the Pause button. Go to the Command Shell Prompt and type "NET PAUSE GSC". Continuing the paused GoodTech Secure Client Service (Windows NT/2000) Go to the Control Panel / Services program, select GoodTech Secure Client from the list of Services and press the Continue button. Go to the Command Shell Prompt and type "NET CONTINUE GSC". The GoodTech Secure Client service uses one Log file gsc3.0.log , to keep a record of everything it does. The log file is kept in the GoodTech Secure Client installation directory. Here is an example of the GSC log file content:
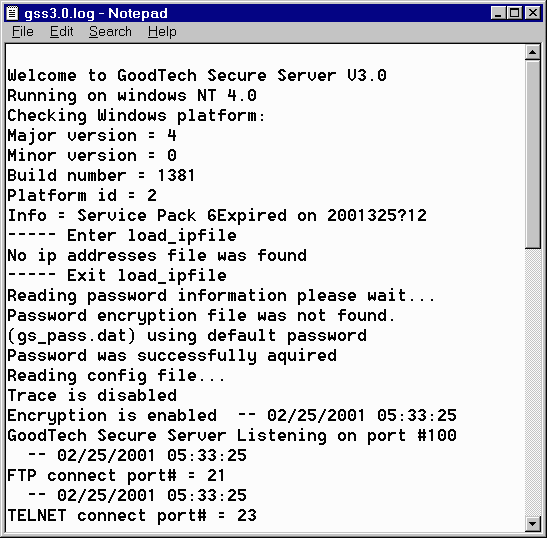
Your log file can grow quite large and quite fast, especially if your host is getting a large number of GSC requests per day. The size of the file can eat into your disk quota and tie up needed space. To reset your log file, simply delete the file when the Secure Client service is not running. Make sure that you don't try to delete your log file when it is actually being written to by the Secure Client. The next time the Secure Client will run, new log file will be created. To enable trace information in the log file you should enter the keyword 'Trace=yes' in gsconfig.dat parameter file. Administrating GoodTech Secure Server Controlling the GoodTech Secure Server Service Starting the GoodTech Secure Server Service Go to the Control Panel / Services program, select GoodTech Secure Server from the list of Services and press the Start button. (Windows NT/2000) Go to the Command Shell Prompt and type "NET START GSS". Stopping the GoodTech Secure Server Service Go to the Control Panel / Services program, select GoodTech Secure Server from the list of Services and press the Stop button. (Windows NT/2000) Go to the Command Shell Prompt and type "NET STOP GSS". Pausing the GoodTech Secure Server Service (Windows NT/2000) Go to the Control Panel / Services program, select GoodTech Secure Server from the list of Services and press the Pause button. Go to the Command Shell Prompt and type "NET PAUSE GSS". Continuing the paused GoodTech Secure Server Service (Windows NT/2000) Go to the Control Panel / Services program, select GoodTech Secure Server from the list of Services and press the Continue button. Go to the Command Shell Prompt and type "NET CONTINUE GSS". The GoodTech Secure Server service uses one Log file gss3.0.log , to keep a record of everything it does. The log file is kept in the GoodTech Secure Server installation directory. Here is an example of the GSS log file content:
Your log file can grow quite large and quite fast, especially if your host is getting a large number of requests per day. The size of the file can eat into your disk quota and tie up needed space. To reset your log file, simply delete the file when the Secure Server service is not running. Make sure that you don't try to delete your log files when it is actually being written to by the Secure Server. The next time the Secure Server will run, new log file will be created. Working with GoodTech Secure Network Securing Any Standard TCP/IP Client/Server Application Working with GoodTech Secure Network is very simple. GoodTech Secure Network support every standard TCP/IP application without changing or modifying your current application. The best way to use our product is to follow these steps: 1. Install GoodTech Secure Client (GSC) on your Windows machine (98/Me/NT/2000) where your TCP/IP client application is running. (You can also install it on any machine on your local network where your machine is configured). For installation directions please refer to Installing GoodTech Secure Client. 2. Install GoodTech Secure Server (GSS) on your Windows machine (98/Me/NT/2000) where your TCP/IP server application is running. (You can also install it on any machine on your local network where your server application is running). For installation directions please refer to Installing GoodTech Secure Server. 3. Create a secure session. For directions please refer to Creating a secured session. If you want to secure one of the applications that have built-in support, i.e. Telnet and FTP, you can skip this step. If you want to change defaults for the applications that have built-in support, you should not skip this step. 4. Connect your client application to the port/host where the GSC is running. 5. Change your default password. For directions please refer to Changing the Password Key. From now on new sessions are secured. To create a new secured session for your TCP/IP application you need to run gt_create_session.exe, that comes with GoodTech Secure Client. gt_create_session.exe parameters:
For example, to create a new secured session issue the command: To get the program usage, just run the program without any parameters.
Screen Shot 7 – Creating a new secured session (gt_create_session.exe) GoodTech Secure Network has a built-in support for Telnet application. The GoodTech Secure Client (GSC) uses port number 23 for telnet requests (can be changed). To secure your telnet session:
When the GSC gets a telnet request, it opens a new secured session and connects to the defined GSS application. From now on all the data is encrypted including user/password. The screen shot below describes a new secured telnet session:
GoodTech Secure Network has a built-in support for Ftp application. The GoodTech Secure Client (GSC) uses port number 21 for ftp requests (can be changed). To secure your telnet session:
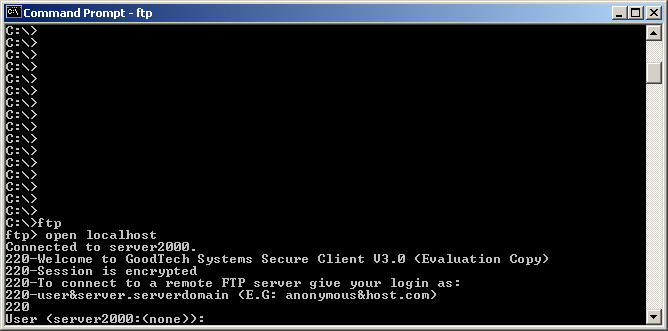
When the GSC gets a ftp request, it opens a new secured session and connects to the defined GSS application. From now on all the data is encrypted including user/password. The screen shot below describes a new secured ftp session:
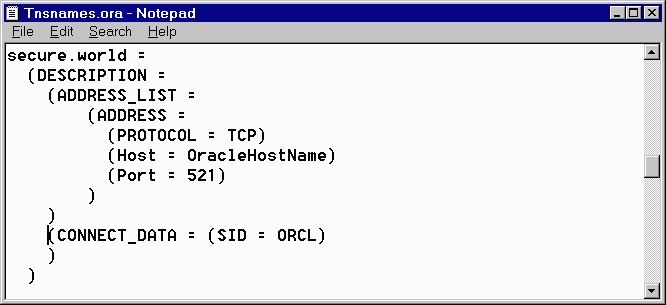
Please note that you need to enter the username with the host information. For example, if you want user "David" to connect to ftp server host "Host1", you should type when prompt for username: David&Host1 GoodTech Secure Network has a built-in support for Oracle. In order to enable a secured Oracle session you need to:
Please note that the session that was created will be deleted after the Oracle client exits. To ensure that the secure Oracle
session remains open for new connections, you should add the line Connection_Lifetime=0 in the GoodTech Secure Client
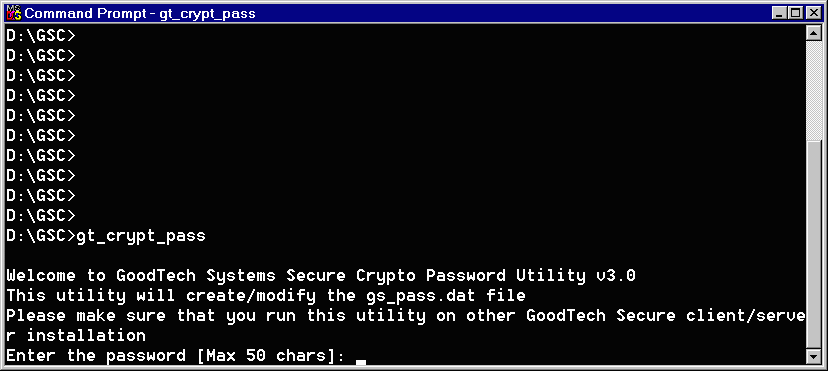
GSCONFIG.DAT file. GoodTech Secure Network implement private key cryptography to secure and distribute session keys. Those session keys are used with symetric algorithms to secure messge traffic. The session key is created when it is needed to encrypt communications and destroyed when it is no longer needed. This drastically reduces the risk of compromising the session key. The private key is at less risk because it is only used once per communication to encrypt a session key. The system is shipped with default private key. Your last step before the system is ready for secured connections is to change the default key. It is recommended to do it as the last step to eliminate key related problems during the installation of GoodTech Secure Network. It is also recommended to frequently change the key. To change the key use the key utility gt_crypt_pass.exe program that comes with GSC and GSS products. To run the program just issue gt_crypt_pass.exe from a command prompt and give it a password. The password is also scrambled so you can not see it in the file (gt_pass.dat). Any change to the password file should be done on both the client and the server sides. GoodTech Secure Client is using the password file as the key for encrypting and GoodTech Secure Server is using this password file as the key for decryption. If the password file is not the same on both sides the encryption/decryption will not work! The following is a screen shot of the password utility program:
It is not uncommon to encounter a problem while using the GoodTech Secure Network, especially if these are your first steps with the product. The best place to look for answers to questions/problems is this Help. You can also try the frequently asked questions list. If your question/problem was not answered/solved, you can try monitoring the log file. If you don't even get to the point that your Secure Network is up and running and the log file does not exist yet, try our error messages list. If your error is listed on that list, you'll find the corresponding recommended course of action. And of course, as your last resort, you can always contact our technical support experts. Don't hesitate to contact us, your questions are welcome. If you contact our technical support, please make sure you provide the following information:
The GoodTech Secure Client/Server service uses Log file to keep a record of everything it does. Most of the entries you'll find in the log file are informational or success messages. However, error messages are also written to the log file, and these are the ones you are looking for when facing a problem. Whenever an error occurs, the Secure Client/Server writes the error number into the log file. You can get the error number by searching the string "error no" in your log file. In case this string is found more than once, the first error message is the error you want to solve. In most cases, other errors are a result of the first one. In the log file, you will find only the error number, but you can easily translate the error number to its description by doing the following: Go to a Command Shell Prompt and type "NET HELPMSG [error number]" If the error description is too vague and you are not sure what should you do to overcome the problem, try to check out the error in our list of common errors for a recommended course of action. The error messages you encounter as you start using GoodTech Secure Client/Server are most likely common errors that others encountered as well. Your initial questions are most likely FAQs and you could probably benefit from reading answers to questions that others have asked as well. |
